Sunday, February 27, 2011

More Spring Planting!

Spring is here in South Texas and I couldn't be happier.  But mind you...we are not completely free of a few more frosts and cold nights.  It's too early to put tomatoes, peppers, squash, eggplant, beans and cantaloupe in the ground, but there's plenty of cool weather vegetables that can be planted now.  If we are expecting a frost or very cold night, I'll just cover the beds with a large frost blanket.  Easy fix :)


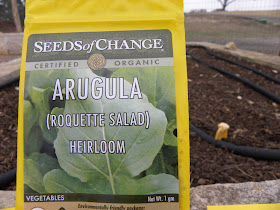
Early last week, I set the soaker hoses in 2 of the three beds I prepped (the 3rd one already has my 1015 onions in it), and planted the following: 

"Originally from Europe and grown for over a century for its distinct peppery flavor.  Leaves and white flowers are all edible.  Great in salads or lightly sauteed with garlic and pine nuts over pasta.  Plant early spring or late summer as it prefers cool weather.  High in protein for a green."

 "Diminutive, sweet romaine from England.  Compact heads with dense, blanched hearts and fine long standing flavor.  The small size and tight heads are a real space saver."

"Beautiful luminescent, bright golden leaf petioles are striking in the garden and on the plate.  Leaves are light to dark green and semi-savoyed.  Steamed or in a stirfry, a great midsummer alternative to spinach, but will produce well into fall.  Baby leaves are great in salads."

"A gorgeous burgundy beet with a flattened globe to round shape that tapers subtly and keeps a uniform size.  Delicious dark green and burgundy leaves with deep red petioles.  More vigorous than most red beets."

 "Highly frilled, deep red leaves that grow slowly but resist bolting.  Excellent as a cut and come again lettuce and stunning in salad mixes."

 
 "Well balanced, earthy, sweet flavor, made the the winner in our (Seeds of Change) recent taste trials.  Shorter roots perform well in heavy or shallow soils.  A popular choice since 1929.  Stores well."

 "Golden roots that are both sweet and round make for a unique beet variety.  The attractive and nutritious, deep green tops feature contrasting yellow stems and are mild flavored and delicious when cooked.  45 days for baby-sized roots; 60 days for full size."

 "Striking reddish purple with a nearly coreless brilliant orange interior.  Good raw, cooked and juiced.  Freezes well for storage.  Unique color and fine sweet taste are sure to be a hit with children.  Slicing and peeling reveals marvelous contrast of colors.  Bred by John Navazio." 

So...as you can see my spring garden is well underway :)  As a matter of fact, the arugula has already begun to germinate!  And I saw a couple of the Little Gem Romaine lettuce heads beginning to peak through the soil this morning. 


I just *love* it when the first tiny seedlings begin to poke their little green heads through the dirt!  I'm one of those weird people that goes out to the garden every day and peers closely at each row to see if anything has begun to germinate.  

My plan is to succession plant the red leaf lettuce, carrots and the beets by planting another row of each in about two weeks.  

I have such high hopes for my spring garden this year.  I've learned so much since getting back into gardening full throttle these past few years.  Wish me luck and I'll surely keep you posted :)

Thursday, February 24, 2011

Busy Bees and Butterflies

I was watering plants in the greenhouse a couple of days ago and my greenhouse was abuzz with honey bees!  They are so neat to watch as they flit about my plants.  It's tough to get good photographs because they don't stay in one place very long, but I got a couple of decent shots when they landed on my red kalanchoes.


I also captured this beautiful, green, mysterious butterfly out there, also flitting among the kalanchoes and geraniumus.  Not sure what this pretty creature is, but I was sure happy to see her dancing about :)


Monday, February 21, 2011

Chunky Red Dal Soup

My husband and I love lentils and there are many lentil soup recipes out there.  I've got a few very good ones in my cooking repertoire that we both really like.  But I bought some beautiful red lentils the other day that I wanted to make a soup with so I did some online research and found this absolutely D.E.L.I.C.I.O.U.S recipe.  It is soooo goood and soooo easy.  It is on the table ready to eat in just about 30 minutes.  My kind of recipe!  And it uses 1 tablespoon of lemon juice...another use for my lemons!  Please give this one a try.  I really think you'll like it.

Chunky Red Dal Soup
1 1/2 teaspoons olive oil
1/2 cup chopped onion
1 1/2 teaspoons peeled, finely grated fresh ginger
3/4 teaspoon smoked paprika
1/2 teaspoon salt
1/4 teaspoon ground cumin
1/8 teaspoon freshly ground black pepper
3 cups water
1 cup dried red lentils, rinsed and drained
1 can chickpeas (garbanzo beans), rinsed and drained
1   14.5 ounce can diced tomatoes, undrained (I used Muir Glen Organice Fire Roasted Crushed Tomatoes because that's what I had...turned out great)
1 tablespoon fresh lemon juice
1 teaspoon harissa (or red curry paste) I used curry paste
Chopped fresh cilantro

Note:  Please do use Smoked Paprika...it really adds depth to this dish


Mix ginger, paprika, salt, cumin, and black pepper in a small bowl and set aside.


Heat oil in a large saucepan over medium heat.  Add onion and garlic; cook until onions are soft, about 6-8 minutes, stirring frequently.


Add spice mixture to onions and cook, stirring constantly, for one minute.


Add 3 cups of water, lentils, chickpeas and tomatoes; bring to a boil.


Cover, reduce heat and simmer for 15-30 minutes, until the lentils are tender, stirring occasionally.   (Mine were done in 20 minutes).  Stir in the lemon juice and harissa or curry paste.


Garnish with chopped fresh cilantro.


Buon Appetito!

Friday, February 18, 2011

Blogging In Style!

I'm truly speechless.

And anyone who knows me knows that *that* is quite a feat in and of itself!  There is a Stylish Blogger award being shared and passed on here in the garden blogosphere.  TS who writes the beautiful and thoughtful blog, Casa Mariposa, so graciously bestowed this honor on my blog, Diane's Texas Garden.  I'm honored and I humbly accept :)

In order to keep the award going, I must post, linking back to the person that gave me the award, share 7 random facts about myself, pass the award onto 15 other fabulously stylish garden blogs, and tell them about the award.  


Seven Random Facts about Me
I'm passionate about good food
Early morning (very early morning) is my favorite time of day
I love a good spring thunderstorm
There are 67 pairs of shoes in my closet
I wish I had had another child~~a daughter
I drink way too much coffee
I truly believe in Universal Law

Here are 15 fabulous blogs that I've recently discovered.  I do hope you visit them.  They are wonderful, creative and so very personal.  

Hill Country Mysteries

My heartfelt thanks to this wonderful, fabulous garden blogosphere community that has become such an integral part of my life.  Each of you is a gift!

Monday, February 14, 2011

Moroccan Chicken with Green Olives and Preserved Lemons

This is a classic Moroccan dish...chicken braised with olives and lemons.  Remember a couple of months ago when I made those preserved lemons?


Well this is the perfect recipe in which to use them.  It may seem difficult, but it's really not.  There are a number of steps to follow and the most important thing is to read through the recipe and make sure you have everything prepped before you begin.  It's not hard at all; just a bit of work but so worth the effort.  It's a great dish to make on a cold, lazy Sunday afternoon.  The familiar taste of chicken braised in a sweet onion-based sauce combined with the exotic flavor combination of ginger, cumin, red pepper, saffron and salty preserved lemons make this dish truly yummy.  I really do hope you try this one.

But first, here's what the preserved lemons look like after they have been curing for about three months:


When using these in any dish, remove and discard the pulp, rinse in cool running water and use only the rind.  Taste them...they are really delicious...salty and very tasty!


Moroccan Chicken with Green Olives and Preserved Lemons
Adapted from All About Braising by Molly Stevens

The Spice Mix
1/2 teaspoon ground ginger
1/2 teaspoon cumin seeds, toasted and ground
1/2 teaspoon freshly ground black pepper
1/4 teaspoon smoked Spanish paprika or sweet Hungarian paprika
1/8 teaspoon saffron threads, crumbled
1/4 teaspoon crushed red pepper

In small bowl, stir spice mix ingredients together and set aside.


The Braise
1/2 cup green olives in brine, such as Lucques, not pitted.
     Cover olives with cool water and set aside to soak while you prep everything else.

One 3 1/2 to 4 pound chicken, cut into 8 pieces; wing tips, back, neck and giblets reserved
      Or you can use 2 3/4 pounds legs and thigh
2 tablespoons extra virgin olive oil
1 tablespoon unsalted butter
Coarse salt
1 medium yellow onion, thinly sliced
3 garlic cloves, thinly sliced
3/4 cup water
1 lemon halved
1/4 cup mixed chopped flat leaf parsley and cilantro
1 whole Salt-Preserved Lemon, pulp discarded and peels rinsed in cool water, and chopped into 1/2-inch pieces


1.  Rinse the chicken pieces with cool water and dry thoroughly or they won't brown well.  Heat oil and butter in a large deep-sided skillet (4-quart capacity) over medium heat.  While oil and butter heat, season chicken pieces lightly with salt keeping in mind the olives and preserve lemons will add saltiness.  When the butter is sizzling, add the salted chicken pieces, skin side down and sear, without disturbing, until the skin is crisp and evenly browned, about 4-6 minutes.  Turn with tongs and brown the second side.


Remove browned chicken pieces to platter or tray to catch any drippings.  Repeat with second batch of chicken, transferring browned chicken to same platter.

2.  Pour off all but about 1 tablespoon of fat from the pan and return pan to medium heat.  Add the onion and garlic and stir with a wooden spoon and saute until the vegetables begin to soften, about 3-5 minutes.  Add the spice mix and stir; saute for another minute or so.


3.  Add the water to deglaze the pan and stir, scraping the bottom with a wooden spoon to dislodge and dissolve the flavorful cooked on crust.

4.  When the water returns to a boil, return the chicken legs, thighs, back and wings to the pan.  Cover, reduce the heat to low and braise the chicken for 10 minutes.  Uncover the pan and if the liquid is simmering too forcefully, lower the heat to a quiet simmer or set a heat diffuser under the pan.  Turn the legs, wings and thighs over and place the chicken breast pieces on top of the legs and wings.  Adding the chicken breasts after 10 minutes prevents them from overcooking and drying out.


Squeeze the juice from one lemon half over the chicken and sprinkle over half the chopped herbs.  Continue to braise gently for 20 more minutes.

5.  After the chicken has braised for a total of 30 minutes, lift the lid, add the olives and preserved lemons and turn the chicken pieces again.


6.  Replace the lid and continue to braise until the juices from the legs run clear with pierced with the tip of a knife, another 10-15 minutes (for a total of 40-45 minutes).  Transfer the chicken pieces to a serving platter to catch the juices, discard the back and wing tips.  Cover the chicken loosely with foil to keep warm.

7.  Increase the heat under the braising liquid to medium high and bring to a boil.  Squeeze in the juice from the other half of the lemon and simmer sauce until it reduces just a bit, about 5 minutes.  Add the remaining herbs, taste for salt and pepper.  Spoon the sauce over the chicken and serve.  Couscous is traditionally served with this dish.


 Buon Appetito!

Friday, February 11, 2011

First Spring Planting-Onions

Yay!  Spring is almost here (well at least it is in South Texas)!   Although you'd never know it by today's weather...it's 25 degrees and freezing!  But it wasn't like that on Tuesday.  Tuesday was sunny, windy, but very warm.  The puppies were in puppy day care so it was a great day for me to prep a few of my garden beds and plant my onions!


My garden beds were in pretty good shape actually; but they did need some attention.  And I always add organic compost to each bed before I plant.  I've been using Lady Bug Soil Revitalizer for years and just love it.  It's completely organic, made locally (in Austin) and contains NO biosludge products.


First thing I did was rake away all the hay that was on top of the beds.  I put the hay on to insulate the soil somewhat and encourage worm production.  And it worked!  As I was turning over the dirt, I saw lots of worms...gotta love that!


I then dumped three bags of compost into each bed.  Now I only prepped three of my six beds on Tuesday because I won't need the others until later this spring.


I turned the dirt over and incorporated all that great compost into the soil and that was pretty much it.  Pretty simple process, really.  

Then I planted my onions.  These are Texas 1015Y...my favorite type of onion that I use in just about everything I cook. But I only bought one set...bad call.  I ran short and had to run out and get a 2nd set.  But by the time I got back home, the weather turned and it got very cold so I'll save planting the 2nd set till the weather warms up a bit, hopefully in a couple of days. 


When planting onions it is crucial to choose a site in full sun, ensuring your transplants get at least 8-10 hours of direct sun per day.  More is better.

My garden beds are rectangular (9' x 5') and so I plant my onions in rows, spacing each row about 6 inches apart.  What I did was create 4-inch deep furrows midway between the rows and spread a band of my favorite, well balanced organic fertilizer, Medina Growin Green Organic Fertilizer (you can get it at Amazon.com), in the bottom of each furrow--about 1 1/2 cups per row--then covered the row with soil.  This makes the fertilizer easily accessible to the roots of each plant as they grow.  I will continue to fertilize the bulbs every 2-3 weeks.

Onion sets are easy to plant and don't require the special attention that onion seeds do (won't ever plant onion seeds...no...no...no...not me...).  I just poked the sets into well worked soil so that the top of the set is level with soil surface...about an inch deep.  It's that's easy.

The care of onion sets is pretty straight forward:
  • weed early and often
  • don't overwater
  • when the tips of the the foliage start to turn yellow, leave off watering.  This is a sign that the bulbs are maturing
  • Fertilize young plants, but stop fertilizing about 5-7 weeks before the expected harvest date
Harvesting is easy too:
  • pull young green onions if you want to use them for scallions
  • watch for the plant tops to start to die back--a sure sign the bulbs are enlarging
  • store in cold dry place


Last year my onion crop was great!  I hope this year is as good.  


I'm so happy to get my spring garden going!  The seeds I ordered should be here any day now and hopefully this weekend I'll be able to start some of my seedlings in the greenhouse.  I'll keep you posted :-)