Sunday, January 30, 2011

Baby Beet Salad - New Recipe

You gotta try this one...it's delicious!


You know I picked the last of my beets about a week ago and I wanted to try a new salad recipe with them.  The original recipe called for Endive lettuce, but I couldn't find it at my grocery store, so I simply used a spring mix, which I really like anyway.  Actually, you could probably use any lettuce or bitter green you like in this recipe.  It's very adaptable (my kind of recipe :-}

Blue Cheese, Roasted Beet and Spring Mix Salad
1 pound baby beets, tops and roots removed, scrubbed clean
Spring lettuce mix or any salad green you like
2 ounces Roquefort or other blue cheese
1/4 cup slivered almonds or chopped walnuts, roasted
1/2 cup Orange Vinaigrette (recipe follows)

Orange Vinaigrette
1/4 cup freshly squeezed orange juice
1 teaspoon grated orange zest
2 teaspoons white wine vinegar
1/2 teaspoon salt
White or freshly ground black pepper
3 tablespoons light extra virgin olive oil, grapeseed, sunflower or canola oil

In small bowl, combine orange juice, orange zest, vinegar, salt and pepper to taste.  Slowly whisk in the oil until emulsified.  Taste and adjust the seasonings.


Place beets on a large sheet of heavy duty aluminum foil and wrap to form a well-sealed packet.  Roast for 1 to 1 1/4 hours, until the beets are tender.  When the beets are cool enough to handle, peel and cut into bite sized pieces.

In large salad bowl, combine the lettuce with enough dressing to coat.  Toss beets with a little dressing as well.

Plate lettuce on individual serving dishes, top with beets, blue cheese to taste, toasted nuts and drizzle with a little more dressing as necessary.  Garnish with orange slices.


And again, if you really want to be decadent, add a sprinkling of that wonderful Truffle Salt!


Buon Appetito!

Thursday, January 27, 2011

I Ordered My Seeds!

Yesterday, I went online to Seeds of Change and ordered the seeds from my spring/summer garden.  Here's what I got:

Blue Lake Bush Bean
Gold Rush Bush Bean
Pronto Beets
Touchstone Gold Beets
Red Core Chantenay Carrots
Dragon Carrots
Golden Chard
Italian White Eggplant
Argula
Lolla Rossa Dark Lettuce (red leaf lettuce)
Little Gem Romain Lettuce
Muskmelon Cantelope
Sweet Corno Di Toro Pepper
Red Ruffled Pimiento Pepper
Bloomsdale Spinach
Golden Scallopini Summer Squash
Peron Sprayless Heirloom Tomato
Giant Martian Slicer Tomato
Chadwick Cherry Tomato

As you can see, I got quite a variety of vegetables.  But I did my research on each variety before I decided to order it.  I wouldn't want to try and grow something that only does well in cool, moist weather.  That is NOT what our South Texas summers are like.  Yet, I want to try and grow different things this year instead of the same old yellow squash, zucchini, purple eggplant, yadayadayada...  Not that I don't like those veggies, I do, but this year I want to push the envelope and see what kind of out-of-the ordinary vegetables I can grow in my little Texas Hill Country garden.  

So we'll see...but to say the least, I'm super excited that my humble 2011 Spring/Summer Vegetable Garden has begun!

Monday, January 24, 2011

It's That Time of Year...

...at least it is in South Texas!  Time to start those seeds for the spring vegetable garden.


The seed catalogs started showing up in my mailbox these past couple of weeks and that always makes me very happy.  I love this part of gardening...the planning of it all.  Just like I love planning meals and making menus.  When I had my cafe and catering business, that was the most fun part for me.

Anyway, back to spring gardening.  

Much of the country is still gripped by awful, cold, snowy weather where gardening is but a distant thought.  But we here in South Texas are blessed to be able to garden pretty much 12 months out of the year.  I'm also very fortunate that I have a wonderful greenhouse where I'm able to start seedlings early for transplanting outside when the weather warms up.

Saturday was a relatively cool, but sunny day, so puppies and I headed out to the greenhouse to begin setting up my mini-hot house. 


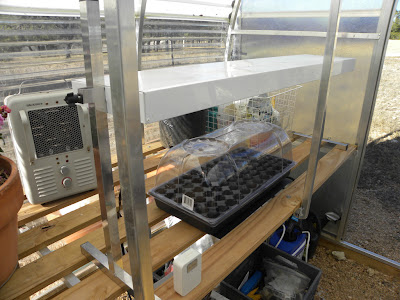
Late last spring, I bought this domed mini greenhouse by JumpStart to get a jump start (haha :) on my spring vegetable garden.


Since it is still pretty chilly, especially at night, I also bought a seedling heat mat to give my seeds a little more warmth to help them germinate.


Another thing that is very important is supplemental lighting.  It's impossible to get seeds to germinate without supplemental lighting.  I have this very cool , adjustable grow lamp that I bought a number of years ago that is an essential part of my seedling set up.  I put all these pieces together, made room on my greenhouse shelf and Voila...I'm ready for spring!


Puppies and I had a good time hanging out in the greenhouse.  There were all these new smells for them to explore  :)


Gretchen discovered that she could actually get water out of the hose!  That was pretty funny. 


While we were in the greenhouse, I gave all the plants a good drink of water and discovered my Christmas cactus (another offshoot of my grandfather's descendant cactus) is beginning to bloom!


And the kalanchoes are in full bloom!


The bees were everywhere too!  They didn't sit still long enough for me to get too many good pictures, but I did capture this tiny bee on my viola.


Wow...I got seriously side tracked here :)  Again, back to spring planting...

Now is the time to begin cool season plants indoors, such as spinach, broccoli, kale, Swiss chard, cauliflower, etc.  These can all be planted in the ground in early spring.  You can also start warm weather crops indoors now too, such as tomatoes, peppers and eggplant, as they will need a bit longer in the greenhouse before they are big enough to transplant outside.  These can usually go in the ground mid to late April. 

I think this year, I'm going to order all my seeds from Seeds of Change.  Last year I ordered most of my seeds from Burpee and was not happy at all.  Many of the seeds didn't germinate.  But the ones I ordered from Seeds of Change did very well.

So now all I have to do is go through the catalogs and pick out what I want to plant this spring and summer.  I'll order the seeds for my summer garden (tomatoes, peppers, squash, eggplant, etc) now as well because as noted, those need a bit longer in the greenhouse to reach transplant size.  I'm so excited!  Stay tuned...I'll let you know what I decide to plant!

Puppies and I had a wonderful time hanging out together on a cool winter day!


Friday, January 21, 2011

Alder Smoked Salmon

I bought my husband a smoker for Christmas and we tried it out this past weekend.  We made Alder Smoked Salmon...and it was delicious!  Moist, creamy and very tasty.


There are many different types of wood chips one can use in a smoker.  Different hardwoods will impart a variety of flavors.  The recipe we used called for Alder wood chips because they impart a delicate flavor that enhances lighter meats.  You can also add bay leaves, garlic cloves, mint leaves, orange or lemon peel and various spices to the charcoal for added flavor.  It'll be fun to experiment with different flavors as we try different recipes.

This Weber Smokey Mountain Cooker Smoker is pretty easy to use.  I bought this one because it came highly recommended by Cooks Illustrated, and to me, they are the Consumer Reports of cooking equipment, etc.  They do all the research and testing, so why I should I reinvent the wheel?!

Anyway,  you fill the charcoal chamber with the recommended amount of charcoal and like any other grill, the charcoal is ready when gray ash begins to form on the top coals.  Spread the coals evenly over the charcoal grate and add 3-4 chunks of dry hardwood (in this case alder wood) chips on top of the hot coals.


The puppies were very interested in what my husband was doing as he prepped the smoker :-}  It was pretty comical to watch.  Everything is new to them and they are so curious!


The recipe for this smoked salmon is pretty simply, but you must allow for brining and air drying time.

Alder Smoked Salmon
Prep time:  15 minutes
Brining and air drying time:  7 to 8 hours
Cooking time:  1 hour
Brine:
1 quart water
1/2 cup kosher salt
1/2 cup granulated sugar
1 quart ice cubes
1 side salmon (skin on) 2 1/2 to 3 pounds, trimmed and deboned

In large pot, combine 1 quart of water with the salt and sugar.  Cook over high heat until the salt and sugar dissolve.  Add 1 quarter of ice cubes.  Set aside until the brine cools completely.

Place the salmon, flesh side down, in a deep pan large enough to hold it and the brine.  Pour the brine over the salmon and refrigerate for about 4 hours.

Rinse the salmon under cold running water and pat dry.  Place salmon, skin side down, on a rack set inside a pan.  Refrigerate and air dry, uncovered, until a thin skin develops all over the flesh, 3 to 4 hours.


Smoke the salmon with alder wood chips until the internal temperature reaches 145F, about 45 minutes to 1 hour.  The center of the fish will still be moist.  For a drier-style smoked salmon, continue to smoke until the internal temperature reaches 165F.  Personally, I like it moister and a little on the medium rare side.

Using 2 large spatulas, carefully remove the salmon from the smoker.  At this point, the flesh breaks apart easily as you can see from this photo!  I had to put it back together to take this picture.


Our first meal using the smoker was absolutely delicious!  I served the salmon alongside the last of the carrots from my garden and Risotto Milanese...wish you could have been there!


Buon Appetito!

Tuesday, January 18, 2011

Last of the Carrots

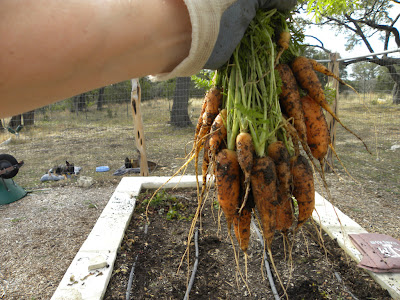
This it is...the last of the carrots from my fall garden.


Although they weren't very big, they were super sweet.  It was hard not to eat too many of them raw while I cleaning them off!

As usual, I wanted to cook them simply in order to bring out the natural sweetness of the carrots themselves. And again, since that was (and usually is :) my objective, I simply roasted them.  Here's a great, easy way to do it:

Herb and Honey Roasted Baby Carrots


1 pound baby carrots, scrubbed clean
1 teaspoon chopped fresh thyme or rosemary leaves (I used a mixture of both)
Salt and freshly ground black pepper
2 tablespoons extra virgin olive oil or butter, melted
1 tablespoon honey (preferably local honey)

Preheat oven to 425F.  Lightly oil a baking sheet large enough to hold the carrots in a single layer.


Arrange the carrots in a single layer in the pan.  Sprinkle the thyme or rosemary and salt and pepper to taste over the carrots.  Drizzle the oil over the carrots and roll/toss evenly to coat.


Roast for 15-20 minutes, until the carrots are mostly tender when pierced with a fork, stirring or shaking the pan occasionally for even cooking.  Drizzle with the honey.


Return to oven for another 5-8 minutes to fishing roasting.  Watch carefully and do not let the carrots burn (which I almost did because I was sitting on the back patio with wonderful husband enjoying the pups and a glass of wine :-}

Serve hot.


Buon Appetito!

Saturday, January 15, 2011

Garden At Rest

Winter is upon us and it's time for me to put my garden to rest.  There weren't very many vegetables left out there so I decided to pick them all, turn off the sprinkler system and mulch all the beds for the season.  We are expecting three to four days of frigid temperatures and what's left out there will freeze and I'll lose it anyway. 
 

I wanted to introduce the puppies to the garden but still maintain control over them and their activities because the central theme of their training is I control everything.  So I brought their beds outside, tethered the pups to the outside of the garden fence, put a bowl of water between them and gave each of them a brand new pig snout to chew on.  They were pretty happy!


 Laci

 Going to town on the pig snout!

 Gretchen having a good time too!


 From inside the garden fence

Once I got the pups settled, I went to work.  I picked all the carrots.  To my surprise, there were still quite a few out there.  At least enough for one more meal.  They weren't very big, but baby carrots are quite sweet and yummy!


Next, I picked all the beets.  Again, these were tiny but roasted baby beets are one of my favorite side dishes.  I have a salad of Endive and Roasted Baby Beet with Gorgonzola Cheese planned for dinner one night this week.  Can't wait for that! 


I picked the last of the cabbage a few weeks ago so I pulled all the stems and threw some of the cabbage leaves over the fence to the deer and some went in the compost bin. 


There is only one small broccoli plant left in the garden that is still growing, but there were lots of little shoots coming off the six spent stalks.  So I picked all of those and it actually equaled quite a good bunch of baby broccoli florets . 


I had two Brussels sprouts plants left and again, the sprouts were small, but there was a good bunch once I picked them all.


I had a large bale of very decomposed hay left over from 2009's Christmas decorations, so I used that to mulch all the beds.  I'm hoping this hay cover will keep the soil somewhat moist and encourage lots of earth worms to grow.  Actually, I did see many earth worms as I was pulling plants and turning soil over.  That's always a very good thing. 


So I spread all the hay evenly over the beds and I had just enough to do all six garden beds. 


I had one head of broccoli left out there that was still growing and it has a little head beginning to form.  Since I hate to pull plants that are still growing and have a chance to produce, I left that one there and just mulched it really well.  Either it will survive the coming cold weather or it won't.  But I wanted to give it its best shot.  And I'll let Mother Nature decide that one. 


I feel the same way about my green onions.  They got a late start due to lack of sunshine but have begun to sprout.  So I mulched them really well and we'll just see what happens.


At the end of the day, I had a pretty good last haul of vegetables from my garden.  I'm very happy that I was able to pull all this before the freezing temperatures hit us.  There's at least four good meals sitting here and for me, that is what it's all about.


After a very long hard (but wonderful) day in the garden, reflecting on how my fall/winter garden produced for me this year, I'm pretty content.  We had many good meals shared with family and good friends and the deer that live outside my fence line ate pretty well too :-}  Life is good.