Wednesday, January 27, 2010

Carrots, Spinach and a Lone Wildflower

There is not a lot going on in my South Texas garden at this time of year.  And I admit, it's *not* my favorite time.  Although I did get out in the garden yesterday and redid the two beds with the lousy soil.  I have a brand new pile of cedar bark mulch ready to use.  There's tons (literally) of this mulch lying around the property.  We had our landscaper bring up a couple of mounds and now I'm all set for the season.

We harvested the first of the carrots this past week!  Baby carrots...and they were delicious! 


My favorite way to prepare them is very simply. 
  • Wash and scrub them well
  • Place whole carrots in medium saute pan with a little butter and a few tablespoons of water
  • Bring mixture to a low simmer; cover and cook for about 5-7 minutes until carrots are fork tender
  • Remove lid; add another tablespoon of butter, a pinch of brown sugar and stir until liquid evaporates and carrots are glazed
  • Season with salt & pepper to taste
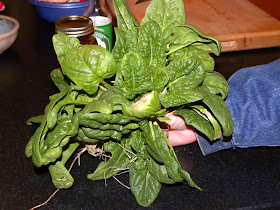
We also harvested some spinach this past week.  I "love" fresh young spinach.  This variety is "Spinach Renegade Hybrid" and I love it because the leaves are curly, dark green and very tasty; not wimpy like baby spinach you get in the grocery store. 


Again, for my taste, a simple preparation is best:
  • Remove the tough stems
  • Wash spinach well but don't dry it; leave some moisture on the leaves
  • Heat a little butter in a saute pan until it begins to bubble; don't get the pan too hot
  • Using a garlic press, press a couple of cloves of garlic in the simmering butter
  • Add the spinach, stir and cover
  • Let spinach simmer for just a couple of minutes, until the spinach wilts
  • Remove cover, stir and season wit salt and pepper to taste

Remember it takes *a lot* of  spinach to make a couple of servings once it cooks down.  I used about four bunches of spinach this size for one serving each for my husband and me.  It was delicious!  And there's more spinach out there :-)

As I said earlier, the garden is pretty low maintenance this time of year.  Which is OK, I guess.  It gives me a little more free time.  Like this morning.  Puppies and I went out to the garden to check on things as is our usual routine.  Since nothing much was happening, I began wandering around the property, camera in hand.  You never know what you're going to see on a cloudy, winter morning.  I alternate looking up in the trees (for birds) and down on the ground (for wildflowers).  In looking down, this tiny purple speck caught my eye.  It is the first wildflower I've seen this winter.  But it seems there is always something blooming here in the hill country.  When I got in the house, I looked in my wildflower book to try and identify it, but couldn't find it in there (I think I need a new wildflower book).  Anyway, whatever it is, it sure is pretty and is a gentle reminder that spring is just around the corner! 


Monday, January 25, 2010

Crop Rotation

As spring slowly but surely approaches here in the South, we begin to think about what to plant this spring.  Yes, I know...it's still "freezing!" in many parts of the country, but this is the time of year that Southern gardeners begin to plan their spring gardens.  And that brings up the subject of crop rotation. 

 
Although it is not essential to rotate your garden crops, think of it as supplemental insurance for your garden.  Your garden won't fall apart if you decide not to rotate your vegetable crops.  However, you may discover that you have a better yield and fewer problems if you follow a crop rotation scheme.  What rotating does is over time, it optimizes the nutrients in your soil and provides a bit of extra protection against pests and diseases.

 
Crop rotation is an organized approach to deciding where to plant what crops in your garden each year.  I admit, I've not always followed crop rotation as I should, but I've decided to be much more diligent about it this coming gardening season.  The more I read about it, the more I'm convinced it is extremely valuable.  It's not difficult.  It just takes a little planning and organization.

 
A useful tool in your garden management kit, crop rotation does not guarantee a successful garden.  You can develop a very detailed, complex crop rotation scheme, but if you ignore the essential step of adding good organic matter to your soil every time you plant, your attempt at crop rotation will be futile.  If you have good, healthy soil full of beneficial microorganisms and good organic matter, there is less risk of pests and diseases invading your vegetable crop.  I discovered this first hand this past fall gardening season.  I had two new beds built and violating my own rule and assuming because they had new "good garden soil", I didn't need to do anything to the soil in those beds.  Wrong.  The squash vine borers descimated my buttnernut squash.  I'm convinced it was because there was very poor soil in that bed.  I didn't add any good organic matter which would have gone a long way in ensuring the health of the soil.  Anyway...didn't mean to get off on *that* tangent again.  Crop rotation is not a substitute for good garden management.  It is simply another useful tool.

Creating a crop rotation schedule is pretty simple.  You must first:
  • decide what you want to plant
  • consider how much space you want to devote to each crop
  • divide your crops into three groups:
    • root crops (potatoes, beets, carrots,onions, garlic,)
    • fruiting (flowering) crops (eggplant, tomatoes, peppers, squash, corn)
    • leafy crops (lettuce, spinach, broccoli, swiss chard, Brussels sprouts)
Once you determine the above items, the crop rotation goes like this:
  • leafy crops follow fruiting crops
  • root crops follow leafy crops
  • fruiting crops follow root crops
It's really that simple.

Rotating crops helps maintain the correct balance in your soil because each group of crops draws nutrients in different proportions from the soil. 

What I did this year was make a list of what I wanted to grow and identified each type of crop.  I then made a sketch of my garden beds and listed what I grew in each bed last season.  Based on what was grown in the fall and what I had on my spring planting list, I determined what vegetable I was going to put in which bed. 


If you had a particular pest problem in one of your beds, sometimes the best thing to do is to skip planting anything in that bed for a year.  Without any host plant available for a year, whatever bug was eating your plants will die out.  The pests will have to fly from another location to reach your vegetables. 

As you can see, crop rotation is not hard.  It just takes a little planning and forethought.  But it can go a long way in helping achieve a healthy productive yield from your vegetable garden.

Thursday, January 21, 2010

Compost

About three years ago, my husband and I bought a compost barrel to compost our kitchen waste. It seemed senseless to throw away all that good organic material, not to mention the acres of decaying leaves on our property just lying there.  I still toss some kitchen scraps over the fence line for the deer, but most of it goes in the compost bin.  The bin we bought is a Mantis ComposT-Twin Compost Tumbler and I really like it!


  It took a while for the material in the bin to break down into useable compost but just before Thanksgiving, I dumped my first load of homemade compost into one of my beds!  It was so neat to be able to do that.


 Many of my friends have asked me about composting so I thought I'd share a little bit of what I know about composting and what has worked for me.

First off, what is compost?  Compost is simply decomposed organic matter, either plant or animal.  Composting is also a natural process that occurs continuously in nature with no help from man.  Think walking in the woods with all the rich, soft, sweet smelling soil underneath your feet...that is compost in its purest form.

Composting is great for two very compelling reasons...it's great for your garden and it is environmentally responsible.  The less "stuff" we put in landfills, the better for our planet.  Especially kitchen/lawn/plant waste that can be used to create good stuff for our gardens.

In the garden, compost improves the soil stucture making it easier for the soil to retain and utilize the right amount of moisture and air.  Compost provides virtually all the essential nutrients for healthy plant growth and time-releases them to ensure a steady, slow, consistent intake of the elements essential for growth.  And healthy soil = healthy plants.

It's not difficult to start a compost pile.  There are two basic kinds of compost piles:  open bins and enclosed containers.  Open bins are usually constructed with wood, chicken wire or recycled plastic.  Enclosed bins are usually upright, box-like containers with rotating drums.  There are advantages and disadvantages to each system:

Open bin composting advantages:
  • easy collection of rainwater and
  • convenience for adding materials. 
Open bin composting disadvantages:
  • attraction of rodents, flies, bees and in certain parts of the country...bears
  • too much moisture if not covered
  • difficulty in mixing if pile becomes too large
  • unattractive appearance, particulary for city dwellers
Container composting advantages:
  • more aesthetically appealing
  • rotating drums are easy to mix and turn
  • rotating drums are easy to unload
  • rotating drums usually have screens which allow for ventilation 
Container composting disadvantages:
  • enclosed containers usually require you to add water
  • upright containers make it difficult to turn the pile
With container composting, two chamber bins are better than one.  This allows for one of the chambers to "cook" the compost while you continue to add to the other bin.  Which means that you have one bin cooking at all times and one for continous adding of material.

OK...once you decide which type is best for you, what to add to the compost pile?  The essential ingredients for a successful compost are:  food, water and air.  The water and air are a given, for the most part.  The food you need to work with a bit. 

Food for the millions of microorganisms that make up a compost pile are categorized in two classes of material:  "Greens" and "Browns".  Green materials are high in nitrogen while brown materials are high in carbon.  Finding a balance between the two can be tricky.  The green materials provide the "microbugs" while the brown materials provide energy.

 Green materials:
  • fresh, green grass clippings
  • kitchen scraps - fruit, vegetables, coffee grounds, tea bags, but NO MEAT SCRAPS!
  • leftover (disease free) fruits/veggies from the garden
  • manure - cow, horse, chicken or rabbit
Brown materials:
  • decomposing (decomposed) grass clippings - brown
  • hay or straw
  • dried grass
It's not likely that you'll add too much brown material to your compost pile; however, too much green is usually the problem.  A pile of kitchen garbage will not become useful compost.  It simply becomes a pile of green, smelly garbage.  It's better to add more brown than green.  The best source of brown material is dry leaves and most everyone has plenty of those.  During the annual fall clean up, using a leaf blower or leaf vacuum, shred and collect as much of the dry leaves as possible.  Store them in large plastic bags in your garage until needed to bring the greens in your compost bin/pile into balance.  Another useful element to add to your compost pile is a couple of shovels of good garden dirt.  Good, active soil is full of beneficial microorganism that will help get your compost pile off to a good start.

Some people use a compost thermometer to monitor the core of the compost pile, but that's a bit technical for me.  Your eyes and nose will usually tell you what you need to add to the mix.  The best ratio of browns to greens is about 4 to 1.  Obviously this is a very rough estimate, but a benchmark to at least begin your compost pile.

Other than the compost container itself, the only tools you'll need are:
  • a pitchfork for turning and mixing the pile
  • a shovel for removing finished compost from your bin or pile and tossing it into your garden
  • a wheelbarrel or garden cart for transporting the compost from the heap to the garden
For efficient composting to take place, you have to have a large enough critical mass to generate a heat core.  Much of the literature I've read and experienced gardeners I've talked with agree that a minimum of 1 cubic foot of raw materials is good.  Of course, more is better.

Once you have your core pile established, you may be tempted to continue to add to it but all this does is set you back to Day 1.  Your compost pile will decompose more quickly if you don't continuously add to it (once it's the size you want it).  This is easy to do with double chamber drums (one drum "cooks"...one collects new materials), but a bit more difficult with open containers.  And in open container compost piles, smaller is better.  They are easier to manage and decompose more quickly resulting in useful compost in a much shorter time period.  It is best to start a new batch of raw materials when your core pile is where you want it to be. 

Another essential element to successful composting is turning/mixing the pile.  This must be done continuously in order to keep the browns and greens in balance, to ensure equitable distribution of moisture and to add oxygen to the mixture.  The core of the compost pile is always hotter and is the most active part of the mixture.  Turning it continuously increases the efficiency of the composting process by bringing the outside raw materials into the center where the little micro bugs are busy breaking down all the material on the inside.

In open container compost bins it is usually not necessary to add water.  Mother Nature takes care of that.  But in enclosed container bins, you often must add water.  Well, you say, how much?  The balance you are aiming for is for the mixture to be moist and damp, but not swimming in water.  The water should not puddle when you turn the bin.  If it does, you've got too much water.  Just add more dry leaves, turn the bin a few times and refrain from adding any additional water until the pile begins to look a bit dry.  And usually what happens is although the bin is enclosed, rainwater still gets in and if you live in an area where it rains pretty regularly, that should be sufficient; but keep an eye on it.

Your compost is ready when it is rich, thick, dark and sweet smelling.  Making compost is a little work and requires some time and attention.  But if you love gardening, to me composting is just part of the whole process.  And look at your reward!  Your garden will thank you :)


Monday, January 18, 2010

Planting Onions

I finally got my onion sets (Texas 1015Y) in the ground!  Saturday morning the rain quit and the sun came out mid morning.  I saw my window of opportunity to plant my onions.  I'll be out of town for the next week to 10 days and I *really* wanted to get these babies in the ground before I left.  Also, according to the lunar calendar, Saturday was the day to plant root vegetables.  (More on lunar planting at a later date...I''m still learning more about it...fascinating stuff!)

Although the soil was a bit wetter than I would have liked, I planted them anyway.  I figured it was better than waiting another 10 days.  This coming week is supposed to be sunny and very warm with high temperatures hovering about 65-68F.  That should dry the soil out nicely.

I went out to the garden early this morning to turn the dirt and let it dry out a bit before planting later in the afternoon.  As usual, the morning was beautiful as the sun was just coming up...another beautiful hill country sunrise.


When planting onions it is crucial to choose a site in full sun, ensuring your transplants get at least 8-10 hours of direct sun per day.  More is better.  As is my constant manta, enrich the soil with 1-2 inches of good compost before planting.  Since I added my first batch of homemade compost to this bed in late November, I didn't need to add any more.  I just gently turned the dirt before planting (happily discovering another treasure trove of earthworms in this bed!).  (OK Diane...enough pictures of worms already!)


My garden beds are rectangular (9' x 5') and so I plant my onions in rows, spacing each row about 6 inches apart.  What I did was create 4-inch deep furrows midway between the rows and spread a band of my favorite, well balanced organic fertilizer, Medina Growin Green Organic Fertilizer, in the bottom of each furrow--about 1 1/2 cups per row--then covered the row with soil.  This makes the fertilizer easily accessible to the roots of each plant as they grow.  I will continue to fertilize the bulbs every 2-3 weeks.


Onion sets are easy to plant and don't require the special attention that onion seeds do (won't ever plant onioin seeds...no...no...not me...).  I just poked the sets into well worked soil so that the top of the set is level with soil surface...about an inch deep.  It's that's easy.

The care of onion sets is pretty straight forward:
  • weed early and often
  • don't overwater
  • when the tips of the the foliage start to turn yellow, leave off watering.  This is a sign that the bulbs are maturing
  • Fertilize young plants but stop fertilizing about 5-7 weeks before the expected harvest date
Harvesting is easy too:
  • pull young green onions if you want to use them for scallions
  • watch for the plant tops to start to die back--a sure sign the bulbs are enlarging
  • store in cold dry place
I am not a fan of raw onions :-( but I loved cooked down, sweet, caramelized onions.  They are the basis for just about everything I cook--soups, sauces, sautes, rice/grain dishes--you name the dish and there's probably a sauteed onion in there. 

As an aside, I was a bit upset when I opened up the onions set and discovered how few bulbs there were in this set.  I usually order my onion sets from Dixondale Farms in Dimmit County here in South Texas.  They are the gurus in onions transplants.  However by the time I got around to ordering my sets, Dixondale was sold out.  So I bought my transplants from a local nursery and was *very* disappointed in the number of onions in the set.  I barely had enough to plant 3 rows!  Not happy...but another lesson learned...order onion sets early!  I asked my wonderful husband to pick up another bundle of sets while I'm gone and I'll just do a succession planting when I get back...it always works out!

Anyhoow...I'm so excited about being able to plant and harvest my own onions.  I grew onions about 3 years ago but I didn't get my sets in the ground early enough the past two years.  I was determined to plant onions this year to use in my Texas kitchen garden!


Friday, January 15, 2010

New Camera!

I splurged yesterday...I bought a new camera!  A Nikon COOLPIX 90.  It's pretty nifty.  It's also much more camera than I'm used to working with.  So it will take some time for me to get used to it and learn to use it properly.  Honestly, it's a bit intimidating but I'll work through it :)

I wanted a camera that has better zoom capacity than the Sony Cybershot I've been using.  Don't get me wrong...I like my Cybershot, but it isn't giving me the zoom capability that I want, especially once spring arrives and the birds return.  We live way out in the hills and our bird population in the spring, summer and fall is quite diverse and usually, spectacular.  I want to make sure I'm able capture the little critters as they make their home here in the hills for the summer. 

My original plan for today was to plant my Texas 1015Y onion sets.  But it's cold, rainy and miserable outside.  So instead of playing in the dirt, I played with my new camera!  It has great macro capabilities as well, great for spying on and photographing the bees as they pollinate my veggies and flowers this spring. 

I guess we'll just see how I like it.  Time will tell...

I love the inside of a tuilp...it reminds me of a kaleidescope.


My poinsettias are still blooming away.


Mr. Cardinal singing high in the treetop.


My lemon tree has been living in the greenhouse since early December.  Although it's a bit stressed from the recent cold snap, it is doing well and it is blooming!  And my greenhouse smell wonderful!


Wednesday, January 13, 2010

The Last of my Fall Garden 2009

It finally warmed up enough yesterday where I could get out to the garden and do some cleaning up.  What a sad sight it was.  The beets were frozen to a crisp.  They looked awful.


But upon closer inspection I saw that there were still baby beets underneath the soil and they looked pretty good actually.  So I pulled them all and discovered that although they were small, they were perfectly fine.  The tops were mush though, so I threw them in my compost barrel and salvaged the fruit.  Looks like roasted baby beets for dinner!


Having pulled the remaining beets, it was time to clean up that bed and get it ready for the next planting. 

During my last garden maintenance project, I pretty much wiped out my cedar bark mulch piles.  I have more mulch piles on the property that I need brought up to the garden area...but that's for another time.

What is left of the existing mulch piles is this fabulous composted cedar bark that is rich, dark and full of organic matter.  It's been on the bottom of this compost pile for about two years and it is wonderful!  Look at this.  If you love dirt like I do, it doesn't get any better than this :)


Anyway, I filled a wheelbarrel full of this mulch and trucked it over to the garden to incorporate it into this bed.  But first I capped off the water supply and removed the soaker hose.


I didn't use my rototiller to turn the soil.  Instead, I simply added the mulch on top of the dirt and turned it with my pitchfork.  As I did this, I made another wonderful discovery...the soil was *full* (and I mean full) of earthworms.  Every handful of soil I picked up had at least three or four worms in it.  Of course they were semi-dormant and not moving around much, but they were there...alive and well!  (It doesn't take much to make me happy...good dirt and earthworms!)


It didn't take a lot to incorporate the new organic matter into the soil.  The dirt was pretty soft and moist and it turned rather easily.  Some of the soil around the edges of the bed was still frozen from our last cold snap! 

I have a couple of bales of alfalfa hay leftover from my fall/winter decorating of the front entry gate.  So I had my husband haul them to the garden and I will use them for additional mulch during the winter and also to add to the soil for organic matter as I get the beds ready for spring planting.  Great stuff.


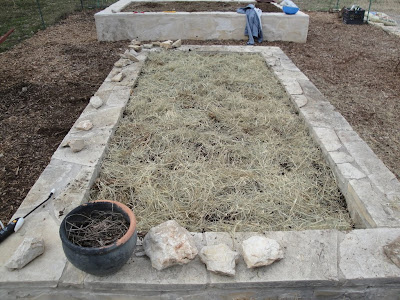
I also added a little hay to the last remaining vegetables in the garden...my carrots and spinach.  They came through the last frigid cold spell unscathed and for that, I'm very greatful.


As you can see, I had a wonderfully productive day in the garden yesterday.  I just loved it.  It was warm, a bit overcast and it felt great to be outside, digging in the dirt and listening to the birds.  And as always, my faithful old boy Tyson was close by.  Isn't he beautiful? :)


Tuesday, January 12, 2010

Red Cabbage

This fall, I planted six red cabbage seedlings and everyone of them grew beautifully.  Of course it was a constant battle between me and the cabbage loopers; and although they did munch a few holes in my cabbage, I was able to harvest every one of the six heads.  They are delicious...crisp and full of flavor. 


I try to find different ways to use the cabbage than the old (in my opinion...boring) cole slaw.  I found this recipe in the most recent Bon Apetit magazine and it is delicious!  I've adapted it somewhat (the original recipe called for ligonberry preserves...I didn't have any so I used red current jelly...just as good).  Try it and let me know what you think.  It is a great seasonal salad full of colors and flavors:

Red Cabbage Salad with Red Current Preserves, Honey Crisp Apple and Toasted Walnuts
Serves 8
3 tablespoons red current jelly, divided
1 tablespoon Dijon mustard
1 tablespoon red wine vinegar
1/2 cup canola oil
1 large unpeeled Honey Crisp apple (you could use Granny Smith or Pink Lady), coarsely grated, divided
1/2 cup walnuts, toasted, divided
4 cups thinly sliced red cabbage


Puree 1 tablespoon preserves, mustard and vinegar in blender.  With machine running, gradually add oil.  Season to taste with S&P.

Reserve 1/4 of grated apple and several walnuts halves for garnish.

Toss cabbage with remaining 2 tablespoons preserves, apple and walnuts in large bowl.  Toss with enough dressing to coat.  Season to tasted with S&P.  Garnish with reserved grated apple and reserved walnuts and serve, passing additional dressing on the side.


Monday, January 11, 2010

Winter Sunrise

I couldn't resist posting another glorious winter sunrise here in the hills of South Texas.  In my mind, it doesn't get any more beautiful than this.


Have a wonderful day...

Sunday, January 10, 2010

Butternut Squash


Butternut squash is my all time favorite winter squash.  So you can imagine how upset I was when I lost most of my fall crop to the squash vine borers.  Grrrrr...  But I did manage to salvage a couple of squash and I roasted them last night and made a delicious Butternut Squash Risotto in my Fagor Pressure Cooker...yes, the pressure cooker!  I just bought this nifty appliance a couple of weeks ago and I'm really liking it!  It cooks beans in minutes and the B/N squash risotto was done in 12 minutes, with no stirring or anything...gotta love it.  Here is the recipe for Pressure Cooker Butternut Squash Risotto:

Roasted Butternt Squash
2 cups B/N squash, peeled and cubed
Toss with a little olive oil, S&P, crushed red pepper, coriander, dried oregano
Roast in a 425 oven for 20 minutes


Remainder of recipe:
3 tablespoons butter
1 small onion, finely chopped
1 cup Arborio rice
1/2 cup dry white wine (anything that you like to drink)
2 1/4 cups chicken broth
1/2 cup Parmesan cheese, finely grated
1/8 teaspoon pepper

In pressure cooker, heat 2 tablespoons butter over medium heat.  Saute onion for 4-5 minutes, until soft.  Stir frequently so onioin does not brown.  Add rice and saute until light brown.  Add wine and stir until wine has evaporated (this only takes about 30-45 seconds).

Add squash and chicken broth; stir well.  Close lid and bring to pressure.  Lower heat and cook for 10-12 minutes.  Release pressure and open lid.  Stir in remaining butter, parmesan cheese and pepper until butter and cheese have melted.  Stir thoroughly and serve.  It is delicious! 

Now if you don't have a pressure cooker, here is the best recipe for Butternut Squash Risotto out there.  Thanks Katie!

Saturday, January 9, 2010

Coldest Day

Today we hit a record low in the hills of South Texas.  The temperature this morning registered 12F.  I've lived in Texas 28 years and the last time it was that cold was January 1985, actually the night my twin sons were born (a day hard to forget, don't-ya-think?)!  The high for the past 24-hour period was 15F.  Unbelievable. 


Needless to say, my garden is just about wiped out.  The carrots and spinach came through OK, but the last remaining beets are gone and so is the rest of the toy pak choi.  But such is the price for gambling with a winter garden.  For the most part, I harvested a pretty good yield out of this winter garden so I cannot say that I'm unhappy.  I lost some vegetables but I learned several valuable lessons.  To me, the trade off was well worth it.  And it won't be long before I begin spring planting.  As a matter of fact, I bought my Texas 1015Y onion sets this morning.  And *that* is my project for next week!

Friday, January 8, 2010

Great New Resource

I don't have any formal training as a horticulturist.  Everything I know about gardening has come from personal experience (years in the dirt), trial and error, other gardeners and books.  I love gardening books about as much as I love cookbooks, which is a lot! 

That's why I was so tickled with a Christmas present I received from one of my sons...a new gardening book.  It's called Rodale's Vegetable Garden Problem Solver by Fern Marshall Bradley and it's wonderful. 

It is encyclopedic in nature, purely organic and an extremely comprehensive resource for the experienced gardener as well as the novice.  It is a collection of essay-like chapters featuring hundreds of organic and natural solutions for dealing with insects, disease and persistent weed problems.  The book also features specifics on when to plant what vegetable, how to determine which variety is best for your region, secrets of success, and what one can do to prevent problems before planting, at planting time and while the crop grows.  It also features a chapter on fertilizers, nutrient deficiency symptoms and a list of organic fertilizer choices.  Organized alphabetically, it is easy to navigate and is written for the average backyard gardener.

Rodale's Vegetable Garden Problem Solver is destined to become a favorite among my gardening resource books.  If you are looking for a comprehensive gardening reference book that will allow you to focus immediately on the problem along with practical, easy to implement solutions, this book is for you.

Wednesday, January 6, 2010

Happy New Year!

Can you believe it?  The start of another year...a new decade for that matter.  It doesn't seem that long ago we were frantically anticipating Y2K and all its predicted horrors.  But alas, it arrived without incident. 


My best wishes for a New Year filled with good health, happiness and green growing things!

What to do in January

Although much of the country is gripped in bone chilling cold, here in South Texas, it is time to think about spring gardening.  There is much to do now to prepare for spring planting.

Flowering Plants
It's time to get flowering bulbs in the ground (tulips, hyacinth, crocus, daffodil, narcissus).  The bulbs should have been purchased in the fall and been chilling in the fridge or garage until now.  Cool-season annuals can be planted such as cyclamen, dianthus, calendula, pansies, petunias and snapdragons.  It's very important to add organic matter to the soil before planting.  You can use composted manure, pine bark, cedar bark, hay, or even fallen leaves from your yard.  The main thing is to add the organic matter to the soil before planting.


Soil
Now is the time to add organic matter to vegetable beds that you've put to sleep for the winter.  The best thing to add is bulky materials such as composted manure, leaves, hay and wood chips.  Adding the organic matter to the soil now gives it time to break down before planting in the spring.  January is also time to mulch your flower and vegetable garden beds.  If you have winter vegetables growing, it's time to mulch them well.  Although South Texas doesn't get as frigid as much of the country, we do experience freezing temperatures and mulching helps protect plants from frost damage. 


Water
Even in winter, it is critical to water actively growing vegetables and annual flowers, especially if frost or freezing temperatures are expected.  Like tonight here in the hills.  A cold front from the frigid North is predicted here tonight, tomorrow and into the weekend, with temperatures expected to drop to 18F (probably lower here in the hill country).  They are not supposed to get above freezing before Sunday.  That's a *major* hard freeze for us.  It is vitally important to water your vegetables and tender plants well.  Plants can resist freezing temperatures much better if they are well hydrated.  Under dry soil conditions and water stress, plants are more likely to suffer freeze damage.  So water thoroughly. 


It's also important to cover your tender babies when the temperatures are predicted to drop below freezing.  Frost blankets work very well to help keep plants insulated. 


Vegetables and Herbs
Wait for a sunny day and then transplant cool season crops such as asparagus, broccoli, brussels sprouts, cabbage, cauliflower, Chinese cabbages, leaf lettuces, onions and Swiss chard.  You can also sow seed of beets, carrots, greens, leaf lettuces, radishes, and sugar snap peas.  Again, remember to add organic matter to the soil every time you plant. 


It's also time to transplant cold tolerate herbs like chives, cilantro, garlic, oregano, parsely, rosemary, sage & thyme.  But have frost blankets ready.  It's best to cover herbs and tender (although cool hardy) seedlings when a freeze is predicted.


Citrus trees are vulnerable to the cold and must be protected from freezing weather.  It's best if citrus trees are in the greenhouse or garage during the winter; but if not and a hard freeze is predicted, you can cover the trees with frost blankets, old blankets from the house or even cardboard boxes.  You can use a utility light for supplemental heating.  The main thing is to protect citrus trees from freezing temperatures. 


Wildlife
And as always, don't forget our feathered (and furry) friends during the winter.  Make sure the birdbaths are full of fresh water for the birds and squirrels and also keep those bird feeders full.  The birds need fuel to stay healthy and strong and protect themselves from the cold.